
ഇനി പൈപ്പ് പൊട്ടിയാൽ പോലും എളുപ്പം റെഡി ആക്കം.!! ഇനി പ്ലമ്പറും വേണ്ടാ പൈസയും വേണ്ടാ.. വെറും ഒറ്റ മിനിറ്റിൽ ശരിയാക്കാം.!! | Repairing Tap Leakage tips
Repairing Tap Leakage tips
- Turn off the main water supply before starting any repair work.
- Use pliers to gently remove the outer cover of the tap.
- You will see another cover inside fixed with a screw.
- Use pliers to slowly turn and loosen the center screw.
- Once the screw is removed, dismantle the tap completely.
- Remove the side lock (nut) of the tap fully.
- Separate all the tap parts carefully.
- Clean each part thoroughly.
- Scrape off rust from rusted areas.
- Wash muddy or dirty parts properly with water.
- After cleaning, reassemble all the parts in the correct order.
- Turn the water supply back on and check for leaks.
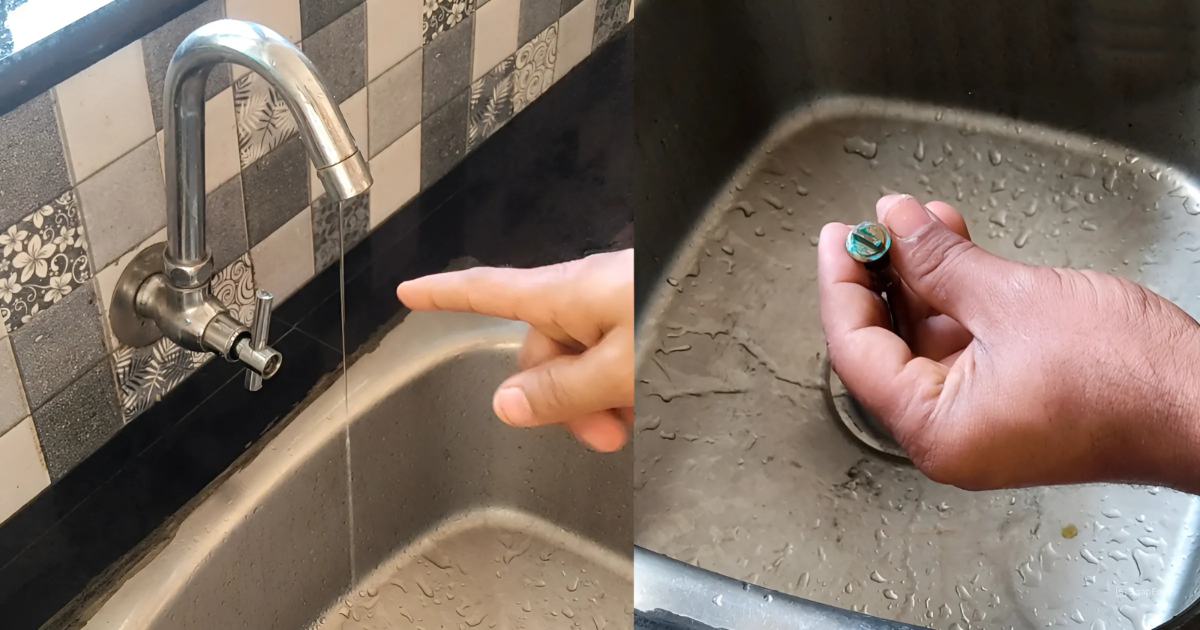
Repairing Tap Leakage tips : “ഇനി പൈപ്പ് പൊട്ടിയാൽ പോലും എളുപ്പം റെഡി ആക്കം.!! ഇനി പ്ലമ്പറും വേണ്ടാ പൈസയും വേണ്ടാ.. വെറും ഒറ്റ മിനിറ്റിൽ ശരിയാക്കാം” അടുക്കളയിലെ സിങ്കിനോട് ചേർന്ന് ഫിറ്റ് ചെയ്ത് കൊടുക്കുന്ന ടാപ്പുകൾ വളരെ കുറഞ്ഞ കാലയളവിനുള്ളിൽ തന്നെ കേടു വരുന്നത് മിക്ക വീടുകളിലെയും ഒരു പ്രശ്നമാണ്. ധാരാളം വെള്ളം കെട്ടിനിൽക്കുന്ന ഏരിയ ആയതുകൊണ്ട് തന്നെ പൈപ്പുകൾ എളുപ്പത്തിൽ തുരുപ്പിടിച്ച് കേടുവരുന്നതാണ് മിക്കപ്പോഴും സംഭവിക്കുന്ന കാര്യം. ഇത്തരത്തിൽ ടാപ്പുകൾ കേടു വന്നാൽ ഒന്നുകിൽ പ്ലംബറെ വിളിച്ച് ശരിയാക്കേണ്ടി വരും,
അതല്ലെങ്കിൽ ടാപ്പ് പൂർണമായും മാറ്റേണ്ടതായും വരും. എന്നാൽ ഇത്തരത്തിൽ കേടാകുന്ന ടാപ്പുകൾ വളരെ എളുപ്പത്തിൽ എങ്ങനെ സ്വന്തമായി ശരിയാക്കി എടുക്കാൻ സാധിക്കുമെന്ന് വിശദമായി മനസ്സിലാക്കാം. ആദ്യം തന്നെ വെള്ളം വരുന്ന മെയിൻ പൈപ്പ് ഓഫാക്കിയതിനു ശേഷം വേണം ഇത്തരം കാര്യങ്ങൾ എല്ലാം ചെയ്യാൻ. ശേഷം പ്ലെയർ എടുത്ത് ടാപ്പിന്റെ പുറത്തു കാണുന്ന ആദ്യത്തെ കവർ പതുക്കെ അടർത്തി മാറ്റുക. ഇപ്പോൾ അതിന്റെ ഉൾവശത്തായി ഒരു സ്ക്രൂ ഫിക്സ് ചെയ്ത രീതിയിൽ മറ്റൊരു കവർ കൂടി കാണാനായി സാധിക്കും. പ്ലേയർ ഉപയോഗപ്പെടുത്തി പതുക്കെ തിരിച്ചു കൊടുക്കുമ്പോൾ
തന്നെ നടുവിലായി ഫിറ്റ് ചെയ്തിട്ടുള്ള സ്ക്രൂ അഴിഞ്ഞു വരുന്നതാണ്. ശേഷം ടാപ്പിന്റെ മുഴുവൻ ഭാഗവും എളുപ്പത്തിൽ അഴിച്ചെടുക്കാം. ഇത്തരത്തിൽ അഴിച്ചെടുക്കുന്ന ടാപ്പിന്റെ സൈഡിലായി ഒരു ലോക്ക് നൽകിയിട്ടുണ്ടാകും അതുകൂടി പൂർണ്ണമായും അഴിച്ചു മാറ്റണം. ശേഷം അഴിച്ചു വെച്ച ടാപ്പിന്റെ ഓരോ ഭാഗങ്ങളായി നല്ല രീതിയിൽ വൃത്തിയാക്കി എടുക്കുക. തുരുമ്പ് പിടിച്ച ഭാഗങ്ങളിലെ തുരുമ്പ് ചുരണ്ടി കളയുകയും, ചളി പിടിച്ച ഭാഗങ്ങൾ വെള്ളത്തിലിട്ട് കഴുകിയെടുക്കുകയും വേണം. ഇത്തരത്തിൽ ടാപ്പിന്റെ എല്ലാ ഭാഗങ്ങളും വൃത്തിയാക്കിയ ശേഷം പഴയ രീതിയിൽ തന്നെ ഫിക്സ് ചെയ്തു കൊടുക്കാവുന്നതാണ്.
ടാപ്പിൽ ഉണ്ടാകുന്ന ചെറിയ രീതിയിലുള്ള ലീക്കേജ് പ്രശ്നങ്ങളും, ബ്ലോക്കുകളുമെല്ലാം എല്ലാം ഈ രീതിയിൽ എളുപ്പത്തിൽ ശരിയാക്കി എടുക്കാവുന്നതാണ്. വിശദമായി മനസ്സിലാക്കാൻ വീഡിയോ കാണാവുന്നതാണ്. എങ്ങനെ എന്നറിയുന്നതിനായി വീഡിയോ കാണൂ.. വീഡിയോയിൽ ഇതിനെക്കുറിച്ച് വിശദമായി പറഞ്ഞു തരുന്നുണ്ട്. വീഡിയോ ഇഷ്ടമായാൽ ലൈക്ക് ചെയ്യുവാനും ഷെയർ ചെയ്യുവാനും മറക്കരുതേ. ഒപ്പം ബെൽ ഐക്കൺ ഇനേബിൾ ചെയ്യൂ. Repairing Tap Leakage Video Credit : suniltech media
Repairing Tap Leakage tips
- Adjustable spanner
- Screwdriver
- Replacement washer or cartridge
- Plumber’s tape (Teflon tape)
- Cloth
🛠 Step-by-Step Fix
1️⃣ Turn Off the Water Supply
Shut off the main valve or the valve under the sink before starting.
2️⃣ Close the Drain
Block the sink drain with a cloth to prevent small parts from falling in.
3️⃣ Remove the Tap Handle
Use a screwdriver to remove the screw and gently take off the handle.
4️⃣ Check the Washer / Cartridge
- For traditional taps: Remove and inspect the rubber washer.
- For mixer taps: Check the cartridge inside.
If worn out or damaged, replace it.
5️⃣ Apply Plumber’s Tape
Wrap Teflon tape around the threads before reassembling to prevent leaks.
6️⃣ Reassemble and Tighten
Put everything back carefully and tighten firmly (not too tight).
7️⃣ Turn Water Back On
Open the valve and check if the leakage has stopped.
Comments are closed.