
ഈ ഒരു സൂത്രം ചെയ്താൽ മതി.!! പപ്പായ ചുവട്ടിൽ കുലകുത്തി കായ്ക്കും; പപ്പായ ചുവട്ടിൽ നിന്നും കുലകുത്തി കായ്ക്കാൻ ഒരു കിടിലൻ വഴി.!! Papaya Air Layering Tricks
Papaya Air Layering Tricks : പപ്പായ ചുവട്ടിൽ നിറയെ കായ്ക്കാൻ ഒരു അടിപൊളി സൂത്രപ്പണി! ഇനി ചുവട്ടിൽ നിന്നും പപ്പായ പൊട്ടിച്ചു മടുക്കും! ഈ ഒരു സൂത്രം അറിഞ്ഞാൽ പപ്പായ എല്ലാം കൈ എത്തി പറിക്കാം! പപ്പായ ചുവട്ടിൽ നിന്നും കുലകുത്തി കായ്ക്കാൻ ഒരു കിടിലൻ വഴി. നമ്മുടെ നാട്ടിൽ സ്ഥിരമായി കാണുന്ന ഒന്നാണ് പപ്പായ, അല്ലെങ്കിൽ കപ്പളങ്ങ പപ്പരയ്ക്ക എന്നിങ്ങനെ വിവിധ പേരുകളിൽ അറിയപ്പെടുന്ന ഓമയ്ക്ക.
നല്ല നീളത്തിൽ വളരുന്ന കപ്പളത്തിൽ നിന്ന് കപ്പളങ്ങ പറിക്കുന്നത് വളരെ ദുസഹമണ്. എന്നാൽ ചുവട്ടിലെ കപ്പളങ്ങ ഉണ്ടായാലോ. നന്നായിരിക്കും അല്ലേ. ഇത്തരത്തിൽ കപ്പളം അധികം വളരാതെ തന്നെ ചെറിയ കപ്പളത്തിൽ നിന്ന് അധികം കപ്പളങ്ങ ഉണ്ടാക്കുന്ന രീതിയാണ് ഇന്ന് നമ്മൾ പരിചയപ്പെടുന്നത്. വീട്ടിൽ വളർത്തുന്ന കപ്പളത്തിന്റെ മുകൾ തണ്ട് ഒടിഞ്ഞു പോയാൽ ആ ഭാഗത്ത് ഒരു പ്ലാസ്റ്റിക് കവറോ അല്ലെങ്കിൽ മറ്റെന്തെങ്കിലും വച്ചോ മൂടിക്കെട്ടുക.
ചെയ്യുമ്പോൾ ആ മാതൃസസ്യത്തിൽ നിന്ന് തന്നെ മൂന്നാല് ശിഖരങ്ങളായി കപ്പളം മാറും. അപ്പോൾ അധികം പൊക്കം വെക്കാതെ തന്നെ നമ്മൾക്ക് നല്ല കപ്പളങ്ങ ചുവട്ടിൽ നിന്ന് തന്നെ കിട്ടും. മറ്റൊരു രീതിയിൽ കടപ്പളത്തെ മാറ്റി നടാം. ശിഖരങ്ങളായി വരുന്ന കപ്പളത്തിൽ വേര് പിടിപ്പിക്കുന്ന എന്നാണ് ആദ്യത്തെ ധർമ്മം. ഇതിനായി മാതൃ സസ്യത്തിൽ നിന്ന് വളർന്നു വരുന്ന ശിഖരത്തിൽ ഏറ്റവും താഴെ ഭാഗത്തായി തല മൂർച്ചയുള്ള പിച്ചാത്തി ഉപയോഗിച്ച് കട്ട് ചെയ്യുക.
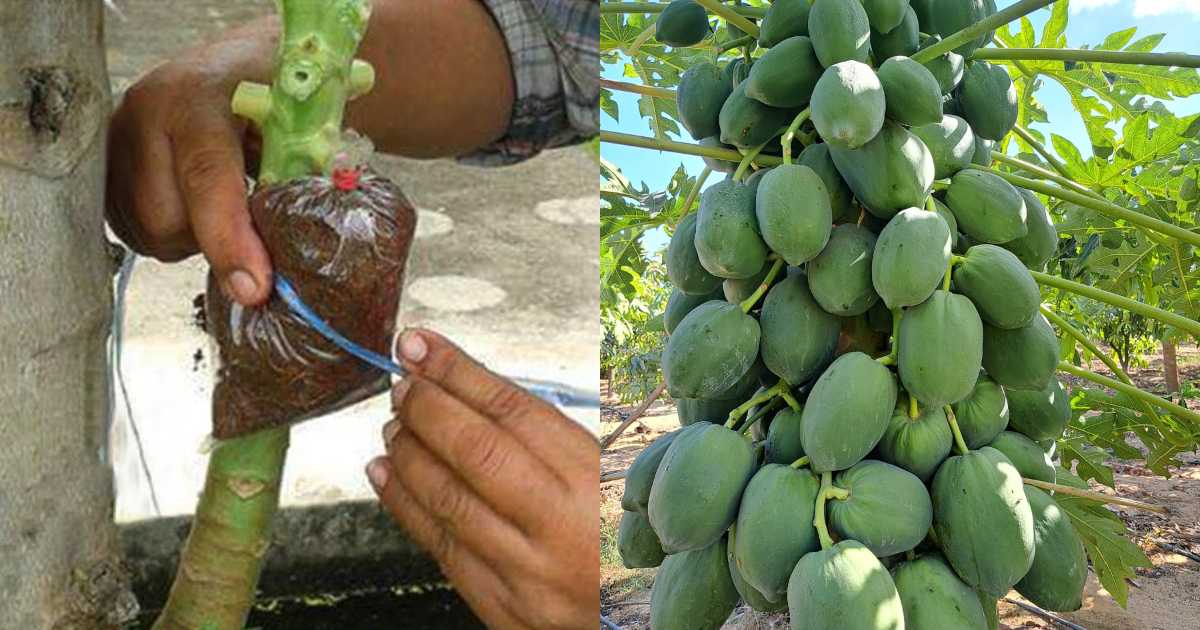
ശിഖരത്തിന്റെ പകുതിവരെ എത്തുന്ന നീളത്തിൽ വേണം മുറിക്കാൻ മുറിച്ച ഭാഗത്തായി ഒരു പ്ലാസ്റ്റിക് ഷീറ്റ് അല്ലെങ്കിൽ ഒരു കമ്പോ കയറ്റി വെക്കണം. തൊലി വിഭാഗം തമ്മിൽ കൂട്ടിമുട്ടാത്ത രീതിയിൽ വേണം കമ്പ് കയറ്റി വയ്ക്കാൻ. പിന്നീട് ചെയ്യേണ്ട കാര്യങ്ങൾ വീഡിയോയിൽ വിശദമായി കാണിച്ചു തരുന്നുണ്ട്. വീഡിയോ മുഴുവനായും നിങ്ങൾ കണ്ടു നോക്കൂ. വീട്ടിൽ പപ്പായ ഉള്ളവർക്ക് ഉപകാരപ്രദമായ അറിവ്. Papaya Air Layering Tricks Video credit : ponnappan-in
Papaya Air Layering Tricks
Step-by-Step Papaya Air Layering Tricks
- Select the Branch: Choose a healthy, semi-mature stem on the papaya plant. The best results come from stems about 8-10 cm thick.
- Ring Cutting: Use a sharp knife to make two parallel cuts around the stem about 2-3 cm apart. Remove the bark between these cuts to expose the inner tissue. This interrupts the flow of nutrients, preparing the stem for rooting.
Peeling and Drying: Peel off the exposed bark between the cut rings. Allow the cut area to air and dry for a few hours to prevent rot.
Apply Rooting Aid: If available, apply natural rooting hormone or a slice of aloe vera gel onto the exposed section to encourage root growth.
Wrapping: Fill moist cocopeat, sphagnum moss, or garden soil around the exposed part. Wrap securely with plastic (use a plastic cup, wrap, or ziplock bag) and close both ends with twine or tape, ensuring the contents stay moist but not soggy.
- Monitor: Keep the wrapped area moist and check regularly for root formation. It usually takes 4-8 weeks for roots to develop visibly.
- Cut and Plant: Once roots are well-formed, cut the air-layered branch from the mother plant below the rooted section and pot it in good-quality soil. Keep in shade for a few weeks before shifting to its final location.
Tips for Best Results
- Use fresh and clean tools to prevent infection.
- Maintain a balance in moisture—avoid excessive wetness to prevent fungal growth.
- Avoid air layering during peak rainy season or intense sun.
- Protect the layered section from heavy wind or physical damage.
Air layering is a great way to quickly establish new papaya plants—especially super dwarf types or valuable varieties—without waiting for seeds to mature.Papaya air layering is a practical propagation method that lets gardeners create new papaya trees from mature branches with minimal skill and resources. Here are easy tricks and steps for success
Comments are closed.