
എത്ര അഴുക്കുപിടിച്ച മിക്സി ജാറും എളുപ്പത്തിൽ റെഡിയാക്കാം.!! ഇതുപോലെ ചെയ്താൽ മതി മിനിറ്റുകൾക്കുള്ളിൽ പുതുപുത്തനാവും; ഇത് ഇത്ര എളുപ്പമായിരുന്നോ.!! Mixie Jar repairing
Mixie Jar repairing : “എത്ര അഴുക്കുപിടിച്ച മിക്സി ജാറും എളുപ്പത്തിൽ റെഡിയാക്കാം.!! ഇതുപോലെ ചെയ്താൽ മതി മിനിറ്റുകൾക്കുള്ളിൽ പുതുപുത്തനാവും; ഇത് ഇത്ര എളുപ്പമായിരുന്നോ” നമ്മുടെയെല്ലാം വീടുകളിലെ അടുക്കളകളിൽ ഒഴിച്ചുകൂടാനാവാത്ത ഒന്നാണല്ലോ മിക്സി. പണ്ടുകാലങ്ങളിൽ അരയ്ക്കാനുള്ള ആവശ്യങ്ങൾക്ക് പ്രധാനമായും അമ്മിക്കല്ലാണ് ഉപയോഗപ്പെടുത്തിയിരുന്നത്. എന്നാൽ ഇന്ന് ജോലിത്തിരക്കു കാരണം മിക്ക വീടുകളിലും അമ്മി ഉപയോഗിച്ചുള്ള അരവിനൊന്നും സമയം കിട്ടാറില്ല. അതുകൊണ്ടുതന്നെ മിക്സിയില്ലാത്ത വീടുകൾ നമ്മുടെ നാട്ടിൽ നന്നേ കുറവാണ് എന്നുതന്നെ പറയേണ്ടിവരും.
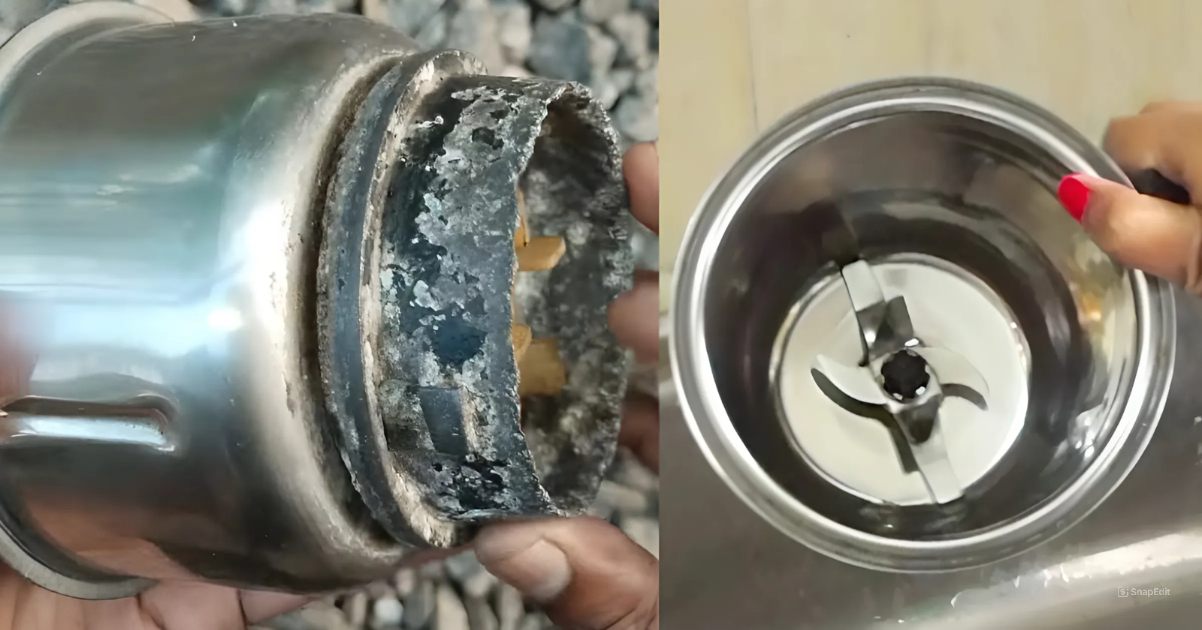
ഉപയോഗിക്കാൻ വളരെ എളുപ്പമാണെങ്കിലും ജാറുകൾ കേടുവന്നാൽ മിക്സി കൊണ്ട് പ്രയോജനമൊന്നും ഇല്ലാത്ത അവസ്ഥയാണ്. പിന്നീട് കേടായ ജാറുകൾ കടയിൽ കൊണ്ടുപോയി ശരിയാക്കി എടുക്കേണ്ടതായി വരാറുണ്ട്. എന്നാൽ ആർക്കുവേണമെങ്കിലും വളരെ എളുപ്പത്തിൽ കേടായ മിക്സിയുടെ ജാർ എളുപ്പത്തിൽ ശരിയാക്കി എടുക്കാൻ സാധിക്കും, അത് എങ്ങനെയാണെന്ന് വിശദമായി മനസ്സിലാക്കാം. മിക്സിയുടെ ജാറുകൾ വർക്കാകാതെ ഇരിക്കാനുള്ള പ്രധാന കാരണങ്ങളിൽ ഒന്ന് അവയുടെ ബേസ് കേടുവന്ന് ദ്രവിച്ചു പോകുന്നതായിരിക്കും. അത്തരം സാഹചര്യങ്ങളിൽ അത് കടകളിൽ കൊണ്ടുപോയി
ശരിയാക്കുകയാണെങ്കിൽ ഒരു വലിയ തുക ചിലവഴിക്കേണ്ടതായി വരാറുണ്ട്. അതേസമയം ഒരു സ്ക്രൂഡ്രൈവർ, ഫെവി ക്വിക്ക് എന്നിവ ഉപയോഗപ്പെടുത്തി വളരെ എളുപ്പത്തിൽ ഒരു പുതിയ ബേസ് നിങ്ങൾക്ക് തന്നെ ജാറിൽ ഫിറ്റ് ചെയ്തു പിടിപ്പിക്കാനായി സാധിക്കും. അതിനായി ആദ്യം തന്നെ ഉൾഭാഗത്തേക്ക് നിൽക്കുന്ന മൂന്ന് സ്ക്രൂകൾ പൂർണമായും അഴിച്ചെടുക്കുക. അതിനുശേഷം മിക്സിയുടെ അടിയിലായി കാണുന്ന കറങ്ങുന്ന ഭാഗം, അതോടൊപ്പം ഉള്ള വാഷറുകൾ എന്നിവയെല്ലാം പതിയെ അഴിച്ചെടുക്കാനായി സാധിക്കും. ഇത്തരത്തിൽ എല്ലാ ഭാഗങ്ങളും പൂർണ്ണമായി അഴിച്ചെടുത്തു കഴിഞ്ഞാൽ
ബേസിന്റെ കേടായ ഭാഗം കാണാനായി സാധിക്കും. അത് മുഴുവനായും മാറ്റേണ്ടതായി വരും. അതുകൊണ്ടുതന്നെ ഒരു പുതിയ ബേസ് മിക്സിയുടെ ജാറിന്റെ അതേ അളവിൽ വാങ്ങി വയ്ക്കുക. ശേഷം ജാറിന്റെ പുറകുവശത്ത് ഫെവി ക്വിക്ക് അപ്ലൈ ചെയ്തശേഷം പുതിയ ബേസ് ഒട്ടിച്ചു കൊടുക്കുക. പിന്നീട് സ്ക്രൂകൾ, വാഷർ എന്നിവയെല്ലാം പഴയ രീതിയിൽ തന്നെ ഫിറ്റ് ചെയ്തു കൊടുക്കുക. ഇത്തരത്തിൽ കേടായ മിക്സിയുടെ ജാറുകൾ നിങ്ങൾക്ക് തന്നെ എളുപ്പത്തിൽ ശരിയാക്കി എടുക്കാവുന്നതാണ്. വിശദമായി മനസ്സിലാക്കാൻ വീഡിയോ കാണാവുന്നതാണ്. Mixie Jar repairing Video Credit : EasyTek Electronics
Mixie Jar repairing
- Safety First:
- Always unplug the mixer before starting any repair.
- Use gloves and a cloth to protect your hands while handling sharp blades or parts.
- Opening a Jammed Mixer Jar:
- Hold the blades inside the jar securely using a cloth to avoid injury.
- The blade unit and coupling usually unscrew in one direction (typically clockwise to open).
- If the coupling or blade is stuck tightly, try gently twisting and pressing in the proper direction to loosen it.
- Do not force too hard, or you risk breaking the jar or hurting yourself.
- Cleaning and Inspecting the Blades and Jar:
- Remove any food particles or debris stuck between the blades. Clean thoroughly.
- Check if blades are dull, bent, or damaged and replace if necessary.
- Inspect the jar for any cracks or damaged seals. Minor cracks can sometimes be temporarily sealed with food-grade sealants, but replacement is safer.
- Coupler and Shaft Check:
- The coupler (plastic or rubber part that connects the motor shaft to the blades) can wear out and cause the jar to not rotate or jam.
- Check if the coupler is loose, cracked, or broken; replace if needed.
- Make sure the shaft inside the jar rotates freely without wobbling.
- Lubrication and Assembly:
- Apply a small amount of machine or mobile oil (food-safe) to moving parts like the shaft and coupler to reduce friction and noise.
- Reassemble the jar carefully, ensuring the blades are securely fitted and the jar is tightly sealed.
- Testing:
- After assembly, test the jar by fitting it onto the mixer base and running it briefly to ensure smooth operation without noise or wobbling.
Comments are closed.