
ഇനി കുരുമുളക് വാങ്ങേണ്ട.!! ഈ ഒരു ഈർക്കിൽ സൂത്രം ചെയ്താൽ മതി; ഒരു ചെറിയ തിരിയിൽ നിന്നും നൂറു കണക്കിന് കുരുമുളക് പറിക്കാം!! Bush pepper cultivation using Earkil
Bush pepper cultivation using Earkil
- Select healthy lateral shoots (3-4 nodes) from fruiting vines; dip in copper oxychloride (0.2%) then rooting hormone; plant in polybags with soil:sand:cowdung:coco peat (2:1:1:1).
- Shade for 60 days with daily watering; roots develop, flowering starts by 4 months; transplant to larger pots with organic mix + neem cake.
- Apply monthly organic fertilizers; spray pseudomonas for growth; harvest berries continuously without labor.
- Compact bush form yields green/dry pepper year-round; ideal for balconies, decorative, and high economic value.
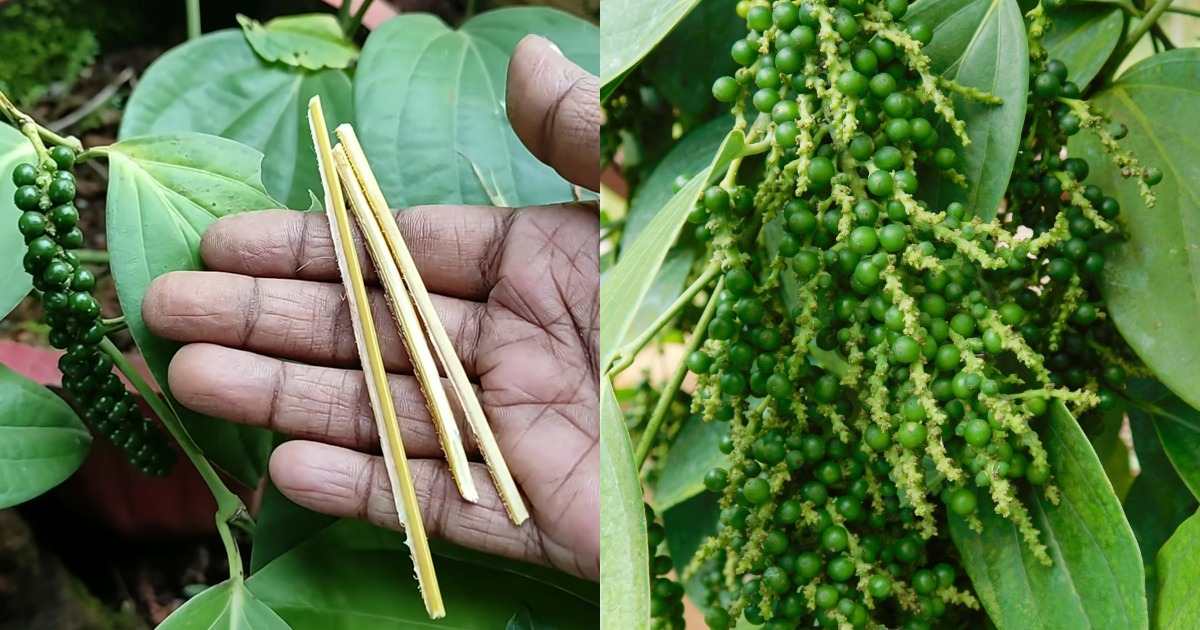
Bush pepper cultivation using Earkil : ഒരു കഷ്ണം ഈർക്കിൽ ഉണ്ടോ! ഈർക്കിൽ ഇനി ചുമ്മാ കളയല്ലേ! ഇനി കുരുമുളക് പറിച്ച് മടുക്കും; ഒരു ചെറിയ തിരിയിൽ നിന്നും കിലോ കുരുമുളക് പറിക്കാം ഈ സൂത്രം അറിഞ്ഞാൽ. ഇനി കുരുമുളക് വാങ്ങേണ്ട! വീട് നിറയെ കുരുമുളക് ഉണ്ടാക്കാൻ ഈ ഈർക്കിൽ വിദ്യ ചെയ്തു നോക്കൂ! കുരുമുളക് എന്നു പറയുന്നത് കറുത്ത സ്വർണം എന്നറിയപ്പെടുന്നത്. ധാരാളം വിലയുള്ള ഇവ നാം എല്ലാവരും വീടുകളിൽ വെച്ച് പിടിപ്പിക്കാറുണ്ട്.
എന്നാൽ കുരുമുളക് ധാരാളം എങ്ങനെ ഉണ്ടാക്കാം എന്ന് നമുക്ക് നോക്കാം. അതിനായി വേണ്ടത് നമുക്ക് ഒരു ചെറിയ വലിപ്പത്തിലുള്ള ഗ്രോ ബാഗ് ആണ്. ഗ്രോബാഗ് എടുക്കുമ്പോൾ അധികം വലുപ്പത്തിലു ഗ്രോബാഗ് എടുക്കാതിരിക്കാൻ പ്രത്യേകം ശ്രദ്ധിക്കണം. ഇനി ഇതിലേക്ക് കുറച്ച് മണ്ണും വളവും ചാണകപ്പൊടിയും ഒക്കെ ചേർത്ത് കൊടുക്കണം. വളം എന്ന് പറയുമ്പോൾ ചാണക പ്പൊടിയോ കമ്പോസ്റ്റോ അല്ലെങ്കിൽ നല്ല നീർവാർച്ചയുള്ള മണ്ണ്
ചകിരിച്ചോറും കൂടി മിക്സ് ചെയ്ത് കൊടുക്കണം. അടുത്തതായി കുരുമുളകിന് ഏത് തണ്ടാണ് തൈ ആയി ഉപയോഗിക്കാൻ എടുക്കേണ്ടത് എന്നാണ്. നമ്മൾ ചെടിയിൽ വെച്ച് തന്നെയാണ് തൈ ഉണ്ടാക്കിയെടുക്കാൻ പോകുന്നത്. നല്ല പ്രായമായ ഇലകളുടെ സൈഡിൽ നിന്നും വേര് പോലെ വരുന്നുണ്ട് ആയിരിക്കും അത് ആയിരിക്കും തൈ ഉണ്ടാക്കാൻ ഏറ്റവും നല്ലത്. അടുത്തതായി കുരുമുളക് ഇരിക്കുന്ന ചട്ടിയും നമ്മൾ തൈ പിഠിപ്പിക്കാൻ പോകുന്ന ഗ്രോ ബാഗും
ഒരേപോലെ വരത്തക്ക രീതിയിൽ കല്ല് സൈഡിൽ വച്ച് കൊടുക്കുക. കല്ലിനു മുകളിലായി തൈ പിടിപ്പിക്കേണ്ട ഗ്രോബാഗ് വെച്ചതിനുശേഷം വേര് പിടിപ്പിച്ച് എടുക്കേണ്ട നോട് മണ്ണിലേക്ക് അമർത്തി വെക്കുക. ശേഷം ഈർക്കിലി എടുത്തിട്ട് ആ തണ്ട മണ്ണിലുറച്ചു നിൽക്കുവാനായി വളച്ച് ഇരുവശങ്ങളിലും കുത്തി ഇറക്കിവയ്ക്കുക. ഈർക്കിൽ കൊണ്ട് നിറയെ കുറ്റി കുരുമുളക് ഉണ്ടാക്കാം. കൂടുതൽ വിവരങ്ങൾക്ക് വീഡിയോ കാണൂ.. Bush pepper cultivation using Earkil Video Credit : Safi’s Home Diary
Bush pepper cultivation using Earkil
- Choose the Right Variety:
Select pepper varieties that suit your climate and purpose, such as milder bell peppers for cooler areas or hot chilies for warmer regions. - Seed Germination:
Soak pepper seeds overnight in warm water. Sow them in seed trays or pots filled with a well-draining seed-starting mix. Keep soil moist and warm (around 25-30°C) for germination in 7–14 days. - Transplanting:
Transplant seedlings outdoors or into bigger pots when they have at least 3-4 true leaves and temperatures remain consistently warm. Harden seedlings by gradually exposing them to outdoor conditions. - Soil Preparation:
Choose well-drained, fertile soil rich in organic matter. Adding compost or manure before planting improves soil fertility. Peppers prefer slightly acidic to neutral soil (pH 6.0-7.0). - Spacing and Support:
Space plants 18–24 inches apart to ensure good airflow and growth. Use stakes or cages to support pepper plants as they grow and bear fruit, which helps prevent breakage. - Watering:
Water regularly to keep soil evenly moist but avoid waterlogging. Consistent moisture promotes healthy fruits and reduces blossom-end rot. - Fertilizing:
Feed plants with balanced fertilizers rich in phosphorus and potassium once fruit sets. Organic options like compost tea or neem cake are beneficial. - Pest and Disease Management:
Inspect plants regularly for aphids, mites, and fungal diseases. Use natural remedies like neem oil or insecticidal soap if pests appear. - Harvesting:
Harvest peppers when they reach desired size and color. Some peppers can be picked green or left to mature fully for different flavors. - Climate Considerations:
In colder climates, grow peppers in greenhouses, polyhouses, or indoors with supplemental light and warmth.
Comments are closed.